Have you ever done something to make an improvement and later regretted it?It would be awesome to be able to go back in time and undo the the thing that were supposed to make an improvement.
While life in general will not allow us to return to an earlier time to make changes, we computer users do have such an option should we experience problems with our Windows XP operating systems.
If you update or install the wrong device driver for your video card, and you delete accidentally delete a critical Windows file, so what.
You can simply use Windows XP's Restore Point feature and, Tada, you're back on track and recovered that deleted file.
Restore Points are snapshots of the state your operating system was in during that time.Windows XP automatically creates a restore point when it senses a major change in your operating system.And Restore Points are created every 24 hours as a safety measure.But you can create a Restore Point manually any time you feel there is a need.
If you have a change of some sort that causes problems with the operating system, you can tell Windows XP to revert to any Restore Point established before the problem occured.After the rollback, every change in the operating system that happened after that Restore Point is eliminated.
Restore Points are generally used when you experience such pc problems as extremely slow performance of the system. Your computer responds far more slowly that it did before you installed or updated something.
Other times to run Restore Point is when your system stops responding after an update or installation. Be sure to create a Restore Point before making any significant change to your computer's software or configuration.
To set a Restore Point, click on Start, point to All Programs, click on Accessories, System Tools, and then click on System Restore.When the System Restore windows appears, click on the button labeled "Create A Restore Point" and click Next.
Enter a description of the restore point, something like "Before scanner device driver install" and click the Create button.A notification will inform you that a Restore Point was made.Now click the Close button and you're all set.
Reverting to a Restore Point is as easy as create one.Click on Start, point to All Programs, click Accessories, System Tools, and System Restore.When the System Restore window appears, click on the "Restore My Computer To An Earlier Time" and then click on the Next button.
Choose the date on which you set the Restore Point and click the Next button.Review the information presented and save any open files.Shut down any other programs that may be running.
Click on the Next button and now your computer will restart. As it restarts, it will present a message informing you of the restore point. Click OK and you're done.
After reading all about setting and reverting to restore points, you should make a known restore point if you have not done so already.Whatever you do after reading this article, don't say I'll get to it soon.Familarize yourself with this feature and create a restore point one.
You should try Restore Point and see how it works before you need it.Create a Restore Point now and update something.You can update Windows Media Player for example.
After the update or the installation of a program,wait a day or so and go back to Restore Point.Revert to the Restore Point you created and see if the old version of Windows Media Player comes back.Or see if that old device driver is present.
Doing a simple task like this can and will boost your computer skills and give you much more confidence in yourself and the Windows XP operating system.
MORE EXTENSIVE INFOS ON WINDOWS XP RESTORE POINTS: http://www.kellys-korner-xp.com/xp_restore.htm
Friday, December 1, 2006
Thursday, November 30, 2006
ReInstalling WindowsXP
If you need to reinstall WindowsXP and want to keep all your current installed applications and settings:
-
Start WindowsXP
-
Go to the location of your source files
-
Run WINNT32 /unattend
I've often need to do this to repair something that had gotten corrupted and didn't want to do a clean install.
Services You Can Disable to speed up your PC
There are quite a few services you can disable from starting automatically.
This would be to speed up your boot time and free resources.
They are only suggestions so I suggestion you read the description of each one when you run Services
and that you turn them off one at a time.
Some possibilities are:
- Alerter - Sends alert messages to specified users that are connected to the server computer.
- Application Management - Allows software to tap directly into the Add/Remove Programs feature via the Windows Installer technology.
- Background Intelligent Transfer Service - The Background Intelligent Transfer service is used by programs (such as Windows AutoUpdate) to download files by using spare bandwidth.
- Clipbook - ClipBook permits you to cut and paste text and graphics over the network.
- Error Reporting Service - Allows applications to send error reports to Microsoft in the event of an application fault.
- Fast User Switching - Windows XP allows users to switch quickly between accounts, without requiring them to log off.
- Help and Support - Allows the XP Built-in Help and Support Center to run.
- IMAPI CD-Burning COM Service - You don't need this if you have other software to create CDs.
- Indexing Service - Indexes contents and properties of files on local and remote computers; provides rapid access to files through flexible querying language.
- IP SEC - Manages IP security policy and starts the ISAKMP/Oakley (IKE) and the IP security driver. If you are not on a domain, you likely don't need this running.
- Messenger - Transmits net send and Alerter service messages between clients and servers. This is how a lot of pop-up windows start appearing on your desktop.
- Net Logon - Supports pass-through authentication of account logon events for computers in a domain. If you are not on a domain, you don't need this running
- Network DDE - Provides network transport and security for Dynamic Data Exchange (DDE) for programs running on the same computer or on different computers.
- NT LM Security Support Provider - Provides security to remote procedure call (RPC) programs that use transports other than named pipes.
- Performance Logs and Alerts - Collects performance data from local or remote computers based on preconfigured schedule parameters, then writes the data to a log or triggers an alert. If you don't need to monitor your performance logs, then you don't need this service.
- Portable Media Serial Number - Retrieves the serial number of any portable music player connected to your computer
- QOS RSVP - Provides network signaling and local traffic control setup functionality for QoS-aware programs and control applets.
- Remote Desktop Help Session Manager - Manages and controls Remote Assistance. If you are not using Remote Desktop you don't need this service.
- Remote Registry - Enables remote users to modify registry settings on this computer.
- Routing & Remote Access - Offers routing services to businesses in local area and wide area network environments. Allows dial-in access.
- Secondary Login - Enables starting processes under alternate credentials. This is what allows you to run an application as another user.
- Smart Card - Manages access to smart cards read by this computer.
- Smart Card Helper - Enables support for legacy non-plug and play smart-card readers used by this computer.
- SSDP Discovery Service - Enables discovery of UPnP devices on your home network.
- TCP/IP NetBIOS Helper - Enables support for NetBIOS over TCP/IP (NetBT) service and NetBIOS name resolution. This should not be needed in today's network environment.
- Telnet - Enables a remote user to log on to this computer and run programs, and supports various TCP/IP Telnet clients.
- Uninterruptible Power Supply Service - Manages an uninterruptible power supply (UPS) connected to the computer.
- Universal Plug and Play Device Host - Provides support to host Universal Plug and Play devices
- Upload Manager - Manages synchronous and asynchronous file transfers between clients and servers on the network.
- Volume Shadow Copy Service - Manages and implements Volume Shadow Copies used for backup and other purposes.
- Web Client - Enables Windows-based programs to create, access, and modify non-local files across the Internet.
- Wireless Zero Configuration - Provides automatic configuration for the 802.11 adapters
- WMI Performance Adapter - Provides performance library information from WMI HiPerf providers.
Configure for Auto-Logon for Windows Xp
If you are the only person using the computer and what to have it automatically log you on,
- Start / Run / "control userpasswords2" - no quotes
- Uncheck User must enter a user name and password to use this computer
Slow Shutdown of Windows Xp
Some people have noticed that they are experiencing a really slow shutdown after installing Windows XP Home or Professional. Although this can be caused a number of ways, the most clear cut one so far is happening on systems with an NVidia card installed with the latest set of drivers. A service called NVIDIA Driver Helper Service is loading up on start up and for whatever reason doesn't shut itself down properly. The service isn't needed and can also increase the amount of memory available to your system. Here is how to disable it.
1: Go into your Control Panel
2: Select Administrative Tools and then click on Services
3: Right click on the file "NVIDIA Driver Helper Service" and then select STOP.
4: To stop this loading up every time you boot up your PC Right click it again and select properties - then where the option "Startup Type" is shown - make sure it is set at Manual like we have shown in the image below.
Make XP display a custom screen saver using your very own pictures
It used to be darn near impossible to create a personal screen saver using your own photo collection. To do this, you had to track down a third-party application and sloppily piece together your pictures to create a screen saver.
Well, the engineers at Microsoft must have realized they hated third-party applications and decided enough was enough. XP can take any pictures stored in your "My Pictures" folder and display them in random order as a screen saver.
To make a personal screen saver in XP, follow these directions:Right-click an empty spot on your desktop and choose Properties.
Click the Screen Saver tab inside the Display Properties dialog box.
In the Screen Saver pull-down menu, choose "My Pictures Slideshow."
Underneath the Screen Saver pull-down menu, adjust the time of inactivity before Windows will initiate your screen saver.
Click Settings to make additional adjustments. You'll be able to adjust transition effects between pictures, how frequently they change, what size the pictures should be, and more.
Click OK when you're done tweaking the settings adjustments.
Press the Preview button to see what your screen saver looks like.
If everything is to your liking, click Apply.
Free Copies of Windows Vista and Office 2007
This sure sounds too good to be true, but it looks like Microsoft is giving everyone a chance to get a free copy of Windows Vista Business(Ultimate) and Office 2007 Professional. All you have to do is register at the website, www.powertogether.com and participate in three (3) qualifying web casts and/or virtual lab sessions within 30 days to get Windows Vista and the to get a copy of Office 2007.
The Power Together Campaign consists of two (2) offers, the Windows Vista Business Offer and the Microsoft Office Professional 2007 Offer, and is open only to legal residents of the 50 United States (includes District of Columbia) 18 years of age or older. You are not eligible to receive these offers if you or your employer is a participant in the Microsoft Partner Program or the Microsoft Developer Network. To be eligible to receive Windows Vista Business, you must register at www.powertogether.com and participate in at least three (3) qualifying web casts and/or virtual lab sessions within 30 days of registration. To be eligible to receive Microsoft Office Professional 2007, you must register at www.powertogether.com and participate in at least three (3) qualifying web casts and/or virtual lab sessions within 30 days of registration. In order to register at www.powertogether.com, you may be asked to provide personal information including name, telephone, and address. All personal information gathered during registration will be subject to Microsoft’s privacy policy. Limit one gift per person per Offer. These offers are non-transferable. These offers expire on February 28, 2007, or while supplies last, and are not redeemable for cash. Taxes, if any, are the sole responsibility of the recipient. If you are eligible for and register to receive both gifts, you must complete a W-9 (Request for Taxpayer Identification Number and Certification) form prior to receipt of the second gift. Any gift returned as non-deliverable will not be re-sent. Please allow 6 - 8 weeks for shipment of your gift(s). Source: Powertogether.com
It says on the website “Windows Vista and Office are great on their own, but with each other, it’s the power of together. Learn how to tap their power.” So, I guess that explains the website name, hopefully the web casts will be something good and useful. Some users have reported they think this is to good to be a Microsoft site and that is probably a phishing site, since it’s not registered to Microsoft, but it looks like it using their name servers, and you do have to login to Microsoft Live. I’m going to login and see what happens.
Added: A post at Channel 9 confirms it, here.
Added: I have officially given up trying for today, I may try later tonight, but I’m getting tired of seing “Sorry, a System Error Occurred”. It says at the bottom of the page, This site hosted for Microsoft by Ascentium, well, I guess they can’t handle being dugg and a bunch of people trying to sign up, I just hope Microsoft rethinks how they do this the next time.
Wednesday, November 29, 2006
Embed MP3 Files Into Your Website
You have an MP3 file (a podcast, a song of your band, a lecture) and you want to share it with the visitors of your site. You can just put a link to the MP3 and let people download it or you can include it as an object and let the browser play it with a plug-in like QuickTime (and most of the times also crash the browser). Most people want to preview the audio and not wait until it downloads completely. You can play a partial MP3 file in audio player, but many people aren't aware of that.
But there's another away: a Flash player that allows you to pause and rewind the MP3. It's like an audio version of Google Video or YouTube, with the difference that the file is hosted on your server (or on another server). While there are many solutions based on Flash, this is the one I like the most. It's a modified version of Odeo player, that's used to play podcasts on odeo.com:
You just have to replace [MP3 file address] with the actual address.
-----------------------
If you know the duration of the audio, add audio_duration=[duration], like this valid_sample_rate=true& external_url=[MP3 file address]&audio_duration =[duration], where duration is a real number expressed in seconds.
----------------------
For autostart:
add auto_play=true to the list of parameters.
auto_play=true&valid_sample_rate=true&...
-------------------------
Auto start, Loop song, Control volume example...
autostart="true" loop="true" volume="50%"
------------------------
Very useful Windows XP/2000 Commands & Tools
Here's the ultimate Windows XP/2000 command list that will make any Linux user feel at home at the command prompt. A lot of these commands are intended for administrating a network, but they are great for savvy home users as well.
- at (windows XP/2000)
Scheduling utility. - bootcfg (XP only)
This utility allows you to set up your boot options, such as your default OS and other loading options. - cacls (XP, 2000, & NT4.0)
Changes the ACLs (security Settings) of files and folders. Very similar to chmod in Linux. - comp (XP & 2000)
This utility is very similar to diff in Linux. Use the /? switch to get examples of command usage. - contig (works with NT4.0 and newer)
A great defrag utility for NTFS partitions. - control (XP only) - unpublished!
Allows you to launch control panel applets from the command line. control userpasswords2, for example will launch a helpful local user admin utility. - defrag (XP only - NT4.0 and Win2k use contig)
Yes, XP comes with a command line disk defrag utility. If you are running Win2k or NT4.0 there is still hope. Contig is a free defrag program that I describe on the defrag page. - diskpart (XP only)
Use this command to manage your disk partitions. This is the text version for the GUI Disk Manager. - driverquery (XP only)
Produces a list of drivers, their properties, and their versions. Great for computer documentation. - eudcedit (XP only) - unpublished!
- fsutil (XP only) - unpublished!
This is a utility with a lot of capability. Come back soon for great examples. - getmac (XP & 2000)
This command gets the Media Access Control (MAC) address of your network cards. - gpresult (XP & 2000)
This generates a summary of the user settings and computer group policy settings. - gpupdate (XP only)
Use this utility to manually apply computer and user policy from your windows 2000 (or newer) domain. - ipconfig (XP, 2000 & NT4.0)
This handy tool displays IP settings of the current computer and much more. - MMC (XP, 2000 & NT4.0) - Microsoft Management Console
This is the master tool for Windows, it is the main interface in which all other tools use starting primarily in Windows 2000 and newer systems. - more
Utility used to display text output one screen at a time. Ex. more c:\windows\win.ini - msconfig (XP only)
The ultimate tool to change the services and utilities that start when your Windows machine boots up. You can also copy the executable from XP and use it in Win2k. - msinfo32 (XP &smp; 2000)
An awesome diagnostic tool. With it you can get a list of running processes, including the residing path of the executable (great for manually removing malware) and get detailed information about hardware and system diagnostics. - narrator (XP only)
Turns on the system narrator (can also be found in accessibility options in control panel). Will will allow your computer to dictate text to you. - netsh (XP & 2000)
A network configuration tool console. At the 'netsh>' prompt, use the '?' to list the available commands and type "exit" to get back to a command prompt. - nslookup (all)
A DNS name resolution tool. - openfiles (XP Only)
Allows an administrator to display or disconnect open files in XP professional. Type "openfiles /?" for a list of possible parameters. - Pathping (XP & 2000)
A cross between the ping and traceroute utilities. Who needs Neotrace when you can use this? Type "pathping" and watch it go. - recover (XP & 2000)
This command can recover readable information from a damaged disk and is very easy to use. - reg (XP & 2000)
A console registry tool, great for scripting Registry edits. - sc (XP & 2000)
A command line utility called the Service Controller. A power tool to make service changes via a logon/logoff or startup/shutdown script. - schtasks (XP only)
A newer version of the AT command. This allows an administrator to schedule and manage scheduled tasks on a local and remote machines. - secedit (XP & 2000)
Use this utility to manually apply computer and user policy from your windows 2000 (or newer) domain. Example to update the machine policy: secedit /refreshpolicy machine_policy /enforce
To view help on this, just type secedit.
NOTE: In Windows XP SP1 and news, this command is superceded by: gpupdate /force - sfc (XP & 2000)
The system file checker scans important system files and replaces the ones you (or your applications) hacked beyond repair with the real, official Microsoft versions. - shutdown (XP & 2000)
With this tool, You can shut down or restart your own computer, or an administrator can shut down or restart a remote computer. - sigverif (XP only)
Microsoft has created driver signatures. A signed driver is Microsoft tested and approved. With the sigverif tool you can have all driver files analyzed to verify that they are digitally signed. Just type 'sigverif' at the command prompt. - systeminfo (XP only)
Basic system configuration information, such as the system type, the processor type, time zone, virtual memory settings, system uptime, and much more. This program is great for creating an inventory of computers on your network. - sysedit (XP/2000)
System Configuration File Editor. An old tool that was very handy for the Windows 9X days. msconfig is what you want to use now. - tasklist (XP pro only)
Tasklist is the command console equivalent to the task manager in windows. It is a must have when fighting scumware and viruses. Try the command:
tasklist /svc
to view the memory resources your services take up. - taskkill (XP only)
Taskkill contains the rest of the task manager functionality. It allows you to kill those unneeded or locked up applications. - tree (XP & 2000)
An amazing experience everyone should try! This command will provide a 'family tree' style display of the drive/folder you specify. - WMIC (XP & 2000)
Windows Management Instrumentation Command tool. This allows you to pull an amazing amount of low-level system information from a command line scripting interface.
Private Character editor. Yes with this program built into Windows XP you can create your own font!
Tuesday, November 28, 2006
WATCH YOUR DIGITAL CABLE OR SATELLITE TV away from home on your laptop
here, there, everywhere!
The Slingbox AV is the perfect companion for your DVR, digital cable, or satellite receiver (Got no box? Try the Slingbox TUNER instead. Got HDTV? Check out the Slingbox PRO!). With the  ability to watch and control your favorite TV source, the Slingbox AV ensures that you can enjoy your TV entertainment anywhere you go. Using an Internet connected computer or compatible mobile phone*, you can watch and control your home TV, DVR, digital cable box, or satellite receiver anywhere around your home or around the globe. With a Slingbox AV you will never be separated from your favorite TV shows, sports broadcasts, breaking news stories, digital video recordings, or video on demand.
COMPLETE CONTROL
 The Slingbox does a lot more than let you just watch your home TV channels over the Internet, it gives you complete control over your cable box, satellite receiver, or DVR. That's right, every feature that's available on your home remote control is accessible through the SlingPlayer interface! This means you can view your electronic program guide (EPG), change the channels, queue a recording on your DVR, or even watch pay-per-view movies. All your favorite features are just a click away, even from half-way around the world (because whole-way around is back home).
SLINGPLAYER
SlingPlayer is the interface that appears on the screen of your computer or mobile device. This pioneering software allows you to watch and control your Slingbox with wide-ranging functionality and ease. Click here to find out more.
Wednesday, November 22, 2006
DVD Shrink 3.2 guide
Recently, compressed domain transcoders have reached quite some popularity. These transcoders are based on algorithms designed to recompress an MPEG-2 stream in real-time for TV broadcast. These programs can transcode an entire DVD movie in only a few minutes, because they do not have to decode and re-encode the entire video stream, but only part of it. I will not go into a detailed explanation of the mechanisms used as they are quite involved but basically what you get is a size (and hence quality) reduction per time unit that cannot be rivaled by regular MPEG-2 encoders (though the latter category can yield better quality). DVD2One was the first program to be based on these principles, now DVD Shrink is the first free program to offer this functionality.
You will need the following software for this guide:
DVD Shrink
ImgTool & DVD Decrypter or a commercial DVD burning program
Step 0: First time setup
The first time you use DVD Shrink you might want to configure the preferences. To do so, press Edit - Preferences.
Step 1: Back up your DVD
The first thing you'll have to do after starting up DVD Shrink is select a source. Press Open Disk to get a list of available DVD drives:
![]()
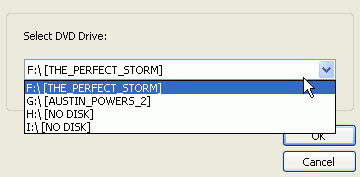 A list of all available DVD drives on your computer will be shown. Select the one containing the movie.
Alternatively you could first rip the DVD to an ISO file using DVD Decrypter and create a virtual DVD drive which you will use as source. This process is explained here.
If you have already ripped the DVD in file mode (thus you have a collection of .IFO, .BUP and .VOB files on your HD) press the Open Files button:
![]() Then press browse and select the folder where your VIDEO_TS directory resides.
Then press browse and select the folder where your VIDEO_TS directory resides.
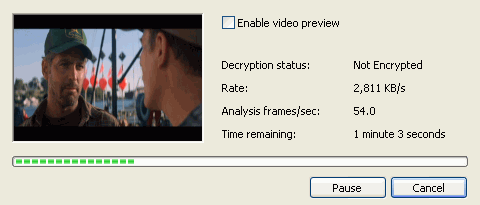
Once you've selected the source disc, or IFO file, DVD Shrink will perform a quick analyzation pass over all the video items. Just let it do its job, it won't take very long.
Once analysis has completed it's time to get to know the different parts of DVD Shrink, starting with the size bar.
![]()
This bar indicates the size of your project. If it contains a red part, your project is too large and won't fit onto a DVD±R disc. By default, DVD Shrink automatically selects a compression ratio to make your movie fit onto the allocated space (the output size you set up in the preferences).
In the upper left side of the window, the general structure of the DVD will be shown. As you can see there are 3 top categories, Menus, Main Movie and Extras. The folders react just like in Windows Explorer so you can click on those having a + sign and they'll open, displaying their contents.

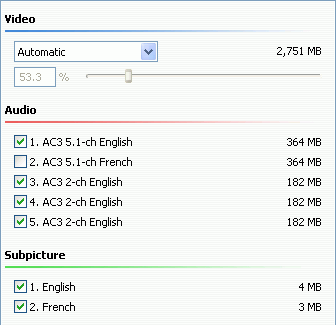
To the right of the structure you have the individual streams contained in the item selected on the left side. Below you'll see how the main movie item looks like. It has a large video stream, 6 audio streams and two subtitle streams. The DVD Structure and the Streams part of the window are where you configure your project. You select the item you want to configure on the left, then you configure it on the right (set a compression ratio, deselect audio and subtitle streams you don't need).
 Note that if you click on the DVD folder on the left, and the percentage shown on the right is 100%, your movie is small enough to fit onto a DVD±R disc without further processing and you can follow this guide to back it up.
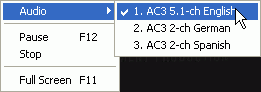
Note that the French audio track is already disabled because I set up my audio preferences to only include English AC3 audio.
Finally, on the lower left we have the preview window. It allows you to preview any title you click on. Simply click on a title, then press the play button. The preview window remembers its state, so if it is playing and you select another title, the title you have just selected will be played. If you stop playback, selecting another title will not start playing until you press play again.
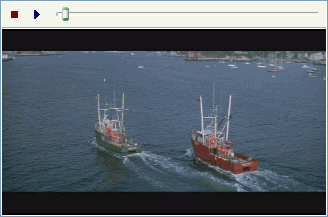 If you right click within the preview window, you can change the audio channel, pause, stop and even switch to fullscreen for a better preview.
Now you have two options: You can either keep the entire DVD intact, or you can choose to only keep certain parts of the original DVD (for instance only the main movie, dropping extras and menus). Obviously, keeping the entire DVD, the video has to be compressed more to fit on a single DVD±R disc, but it allows you to keep all the fancy menus. If you want to keep everything, press the Backup! button.
![]()
If you prefer to keep only parts of the disc and discarding parts (or all) of the extras, select Re-author instead (technically, when re-authoring you create a new disc from scratch and add whatever you like from the original disc to it). Re-author allows you to create your own DVD by putting only content that you really want on a DVD. It does not allow you to keep the menus though. If you want to entirely remove certain items but keep the menus you have to use program like IfoEdit or commercial transcoders like InstantCopy and DVD95Copy. You can also combine IfoEdit with DVD Shrink, remove stuff you don't want in IfoEdit, then compress the remaining movies using the Re-encode function of DVD Shrink but that's beyond the scope of this guide since DVD Shrink is a program mainly designed for beginners.
So now that you know what you can do, what will it be? Keep everything on the DVD, remove some items or keep the main movie only? Note that the main movie can consist of multiple parts (episodic DVDs, like TV series), but the guides cover this case as well. If you have a flipper disc (1/2 of the movie is on one side, the other half on the other side of the disc) and you'd like to join this to one DVD±R disc, or if you want to put two movies onto one DVD±R, there is a special guide for joining multiple DVD discs to one DVD±R.
Removing certain movie items requires basically the same procedure as keeping the main movie only. All you have to do is follow the main movie only guide, then just add more movie items after the main movie and configure them the same way you configure the main movie.
TightVNC - A good utility for remote client PC
Download
Official Web Site
Great tips for earning in adsense
great tips for earning in adsense
Google gives out secret trick to Improve CTR!!
One of the best tricks to improve your CTR (click threw rate), is to constantly make changes to your ads.I don't know how many of you even know about the option you have in your Adsense account, to select multiple color palettes, for 1 Adsense ad.What does this option do, how does it work, and why should I use it?It's very simple. Instead of you manually changing the way your ad looks every now and then, you can set it to be automatic, so it changes constantly with out you needing to do a thing.You'll have to ask Google exactly how it works.. But what I know is that it simply modifies the code which is generated, to have the option of changing the color palette.Why should you use it?! That's a good one..Ok Ok.. I'll explain..Assuming your site has visitors who come back to your site, or even if you don't, and most of your visitors are
first timers and will never come back again, it is good to have a variety of ads. Different ad colors attract different people, and it is good to mix and change constantly.People who come back to a site they have visited before, will suddenly notice a slight change in your site, and then they will look for the change, and see the different ad. Which means they got attracted to the ad (which is good).Now, since I know you'd love to have a screen shot tutorial of this terribly complicated process, I have created one.. I made it extremely easy to follow so you'll all be happy.You can find it right Here.That's the end of this tip/trick..I know you liked it, but I still like to hear comments..!Amigo!
This is my first post!
I don't have any to post yet. However, I have a joke for you guys. Here it goes:
Blond Farmer
A man is driving down a country road, when he spots a farmer standing in the middle of a huge field of grass. Of course, the farmer is blond.
He pulls the car over to the side of the road and notices that the farmer is just standing there, doing nothing and looking at nothing.
The man gets out of the car, walks all the way out to the farmer and asks, "Ah, excuse me, mister, but what are you doing?"
The farmer replies, "I'm trying to win a Nobel Prize."
"How?" asks the man, puzzled.
"Well, I heard they give the Nobel Prize to people who are out standing in their field!"